Compatibility: Requires firmware version 2.0.12 and Config Tool version 1.0.0
Utilize the Lever Arm feature for tooltip projection.
Why is the Lever Arm feature useful?
You can use the Lever Arm feature in scenarios such as bolt-tightening sequencing, inspection workflows, or manual assembly steps involving tools where recording the position of the tooltip is essential. This feature is easily configured in a few steps and provides positioning accuracy and reliability.
Once the Lever Arm setup is finished, a virtual Mobile will appear in the 3D Visualizer, displaying the tooltip location. The Device Log will then output the position of this virtual Mobile, maintaining the same level of accuracy as that reported by the real-world Mobile.
Additionally, the user can use the Draw feature along with Lever Arm to trace the projected Mobile’s path. This may be especially impactful is especially impactful for users who require the position data produced while this feature is enabled. For instructions on how to enable this feature, see our Lever Arm Drawing help article.
Mobile Attachment
Before attaching the Mobile, it’s best to first stop positioning. After that, locate the Mobile’s MAC address on the label on the back of the device. Next, securely attach the Mobile to the tool intended for the workflow. When placing the Mobile, it’s important to remember three key factors:
-
The Mobile needs to maintain a clear line of sight to 4 Mobiles to ensure that accurate positioning results are achieved. Place the Mobile prominently, where the user’s body or other environmental blockages will not impact the line of sight.
-
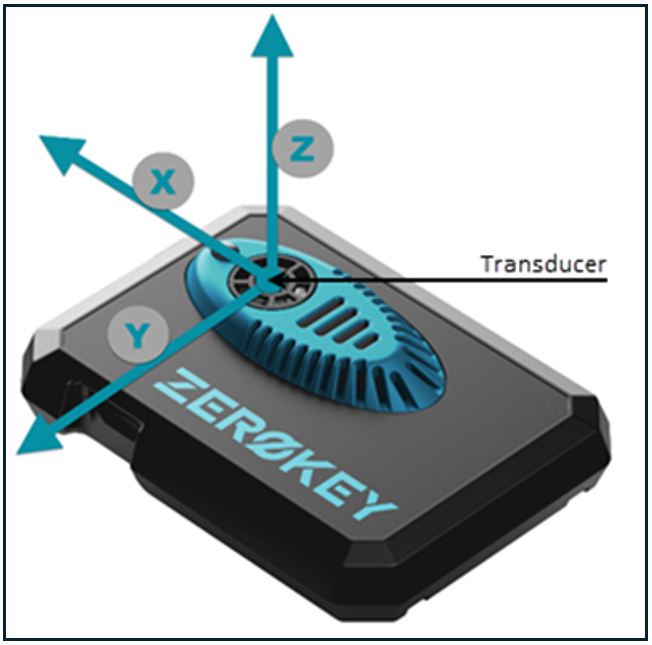
Mount the Mobile with the button facing forward.
-
It’s important that the Mobile does not move from its position on the tool. If it does, the position data won’t be accurate.
Launch the Add Lever Arm window
Once the Mobile is fastened to the tool, navigate to the 3D Visualizer in the Config Tool and launch the Add Lever Arm window by clicking on its icon.
|
Lever Arm Button |
Description |
|
|
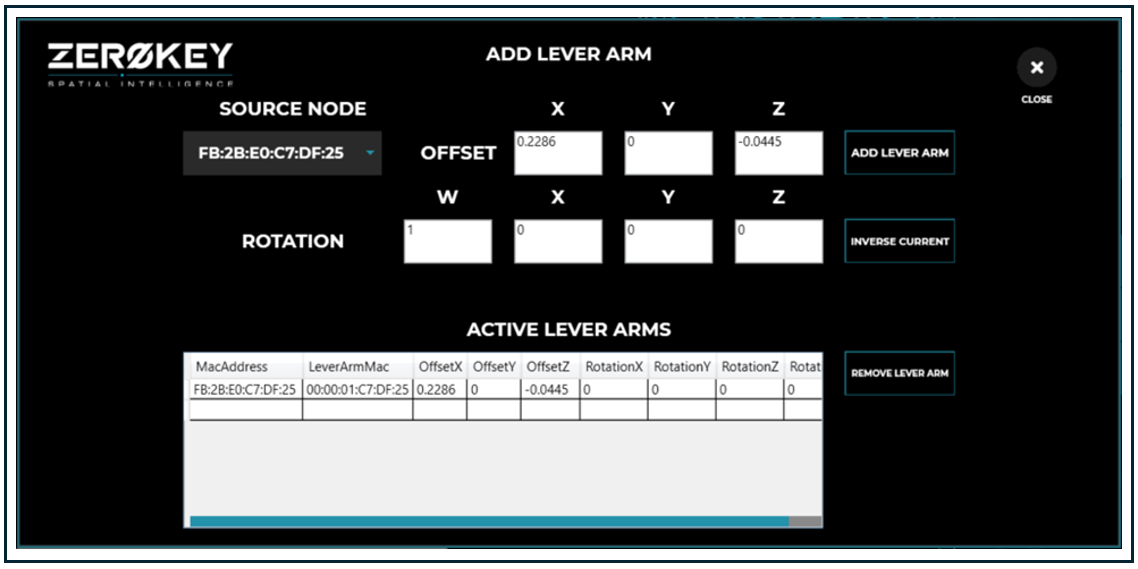
Add Lever Arm: This button launches a pop-up window that allows the user to input the measured offsets of a projected point from a Mobile. |
-
Choose the desired Mobile from the Source Node dropdown menu.
-
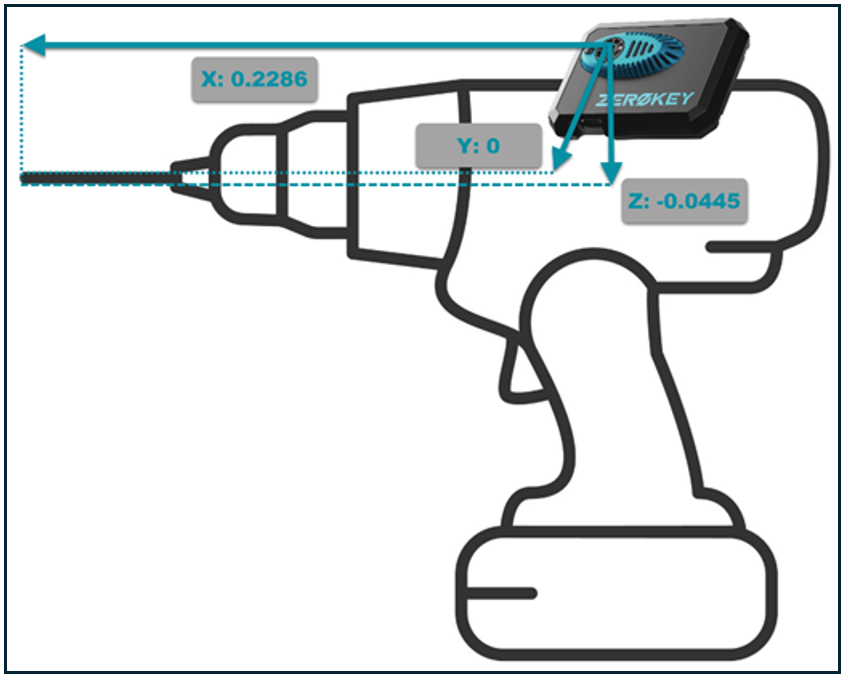
Measure the distance from the center of the Mobile’s transducer to the tooltip in each axis.
-
Enter each measured value into the respective field in the Add Lever Arm window.
-
If an axis has no offset, enter “0” in the corresponding field. For negative offsets, enter the value with a negative sign.
-
Ensure accuracy in entering values to avoid generating erroneous data and inaccurate results.
For reference, an example of the measurement in each axis to a tooltip is provided below.
Add Lever Arm
Once each offset value is entered, click the Add Lever Arm button located on the right side of the text fields to activate the lever arm. The Active Lever Arms table will populate with the new lever arm parameters and will be saved until permanently deleted by clicking the Remove Lever Arm button.
Close the Add Lever Arm window by clicking the Close button in the top right corner of the window. The lever arm is now active and will be displayed until it’s disabled by the user.
Positioning: 3D Visualizer
Click the Start button to view both Mobiles’ positions within the tracked space. While moving each Mobile within the line of sight of 4 Anchors, note that each Mobile’s rotation and orientation are visualized.
Positioning: Device Log
Both Mobiles’ positions will be outputted in the Device Log. The active Mobile’s MAC address will be reported first, with the virtual Mobile’s MAC address being reported second. The virtual Mobile’s MAC address will be reported as 00:00:01, with every additional virtual Mobile following the numbered sequence. The following is an example of what this can look like:
[2024-03-22T13:26:58.1753] COM56: |I| rf_cmd_update_position: Node:
FB:2B:E0:C7:DF:25 seq: 768 ins: 0 pos: 1.54758,-1.04991,1.18907 vel:
0.00000,0.00000,0.00000 rot: 1.00000,0.00000,0.00000,0.00000 flag: 00
pf: 43 ts: 261773059
[2024-03-22T13:26:58.1753] |I| rf_cmd_update_position: Node:
00:00:01:C7:DF:25 seq: 768 pos: 1.77618,-1.04991,1.14457 vel: 0,0,0 rot:
0,0,0,0 flag: 00 ts: 0
Disable Lever Arm
When the Lever Arm is no longer required, the user can simply navigate to the 3D Visualizer, launch the Add Lever Arm window by clicking its icon and deselect the Mobile from the Source Node dropdown menu. The Lever Arm settings will be saved until they’re needed again.